The Double-Helix Wort Chiller
I haven’t brewed in quite a while and part of the reason is that over the winter I lost my wort chiller. It wasn’t misplaced but rather I failed to sufficiently blow out all the water after a brewing session and the water froze inside, bursting the copper coils in several spots. Since then I’ve had to borrow a wort chiller in order to brew but alas, no more!
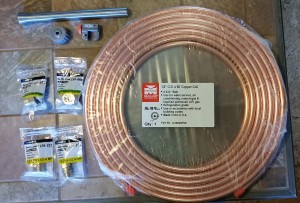
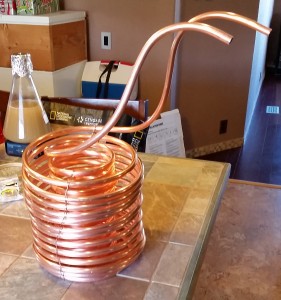
In building a new one I wanted to upgrade from my previous. It consisted of 25′ of 3.8″ O.D. copper tubing and while it worked it wasn’t the most efficient nor fastest chiller around. I saw a design for a double-helix chiller on YouTube and really liked it. I went shopping to see if I could buy one but did not find anything like it. The closest I found was a single coil unit that used 70′ of 3/8″ copper tubing and that sold for $150. So I set out to build my own. Here are all the parts needed and there is a more detailed list provided at the end.
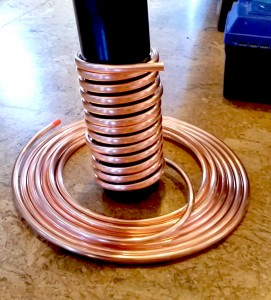
The idea behind that double-helix is to cool the center of the brew pot where most of the heat is concentrated and then circulate the water out to the edge coils. I started by coiling the copper around a piece of 4″ PVC pipe. If you don’t have such a pipe lying around, head to Lowes or Home Depot and see if you can buy one of their miscellaneous cut ends. I picked up a 3′ section up for around a dollar. 4″ diameter is about the minimum you can coil 1/2″ copper tubing. Be very careful! It is easy to kink it or create flattened sections.
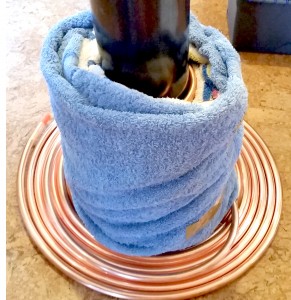
When I reached 12-13 windings it was time to start coiling back towards the top. To achieve sufficient spacing I followed the directions in the video and wrapped the first coil up with two bath towels, each folded in half length-wise. The towels were held in place using packaging tape while I created the outer coils.
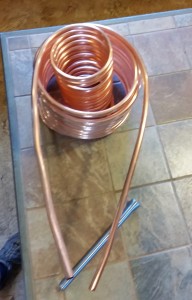
Once the two coils were finished I uncoiled some of the inner coil, enough to create a tall spout for the cold water inlet. I had left enough copper left over while making the outer coil to create the hot-water spout as well.
The spouts are bent outwards so that they hang over the boil kettle once submerged. The reason is that if any water leaks from the fitting or the hose connections, it will not leak into your freshly sanitized brew. Use the spring-tool to make these bends! Trying to do this without a proper bending tool will likely cause you to kink the tubing and force you to cut it off and try again, thereby shortening your spout.
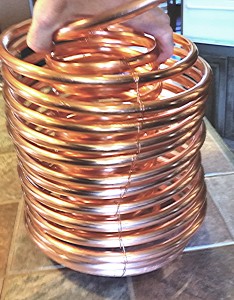
Notice the wire holding the coils in place. I used bare copper hobby wire (18 gauge) to keep the separation constant between the windings and between the inner and outer coils. I want the copper tubing to contact as much wort as possible when chilling. This also makes it easier to handle the chiller for cleaning and storing. Otherwise it is a lot like trying to work with a large Slinky.
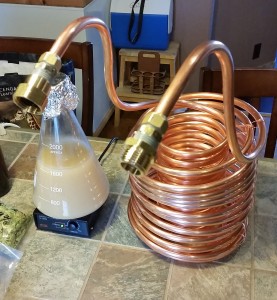
The last step was to attach the two 1/2″ compression fittings to the copper tubing. The ends of the coil I purchased were slightly out-of-round and I had to use a tube cutter to remove about a 1/4″ from each side. After cleaning up the cut ends I attached the fittings using ordinary Teflon tape and wrenches to snug it all up. I then attached the two garden hose fittings, also using Teflon tape. The cold-water inlet has the female garden hose fitting and the hot-water outlet has a male-threaded garden hose fitting.
And that’s all there is to it. Total time from start to finish was just over an hour. I still need to leak test it and then use it on my next brew day and report back.
[Update 5/15/2014]
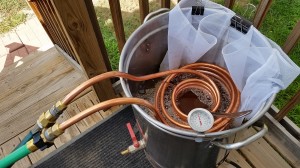
Here is a photo of the new chiller in action. There wasn’t so much as a drop coming out of the solderless connections. The wort went from boiling temp to 140°F in under 2 minutes and all the way down to 75°F in 4:56. Nice, fast, efficient.
Below are the parts and tools list as well as links to where these items can be found at Lowes. Total parts cost including sales tax was $115. I will loan out my tools and the PVC pipe should anyone else like to build one.
Parts List
- (1) Copper tubing 50′ x 1/2″ O.D.
$83.00 - (2) Watts Part #LFA-221
Compression Adapter
1/2″ OD x 1/2″ MIP
$6.59 - (1) Watts Part #LFA-668
Garden Hose Adapter – Male
3/4″ MH x 1/2″ FIP
$3.39 - (1) Watts Part #LFA-672
Garden Hose Adapter – Female
3/4″ FH x 1/2″ FIP
$6.15
Tools Needed
- (1) 1/2″ tubing spring bender
- (1) 1/2″ tubing cutter
- (2) crescent wrenches or
two wrenches to tighten down the
Watts solderless fittings - (1) 4″ PVC Pipe at least 2′ long
Recent Comments